Showing posts with label Barry M. Show all posts

Monday, 6 August 2012

Day 8 *Black & White Challenge* - Peter Pan Collar

After a while of having a 'nail block' in terms of the Black & White Challenge, I finally came up with a bit of nail art that I thought was good enough to be in here. Although it's taken a while, I have a design for day 8 of the challenge which was to be 'inspired by fashion' and a recent fashion that has caught my eye is the 'Peter Pan Collar'. I see it everywhere and I love the look it adds to an outfit! You can look smart but quirky :) I don't have many items of clothing with this kind of collar, but I know I'll be investing in some very soon!


So here is my take on the Peter Pan Collar :)


To do this design, I used half moon stickers to create the crescent shape near my cuticles.
Nail varnishes: Base/Top Coat - Barry M, Black - Beauty UK, White - Barry M
Also a thin brush for details and to neaten up the collars.


This mani was pretty parallel in terms of style with my previous 'Tuxedo' post which you can find here.

And there you have it - essentially Peter Pan nails!
Thank you for reading :) x


Day 1:White Base With Black
Day2: Black Base With White
Day3: White/Black Inspired By A Band
Day 4: Black With Glitter
Day 5: Coloured Base With Black/White
Day 6: Gradient Base With Black
Day 7: Black/White Half Moon Manicure
Day 8: Black/White Inspired By Fashion


Saturday, 21 July 2012

Models Own 'Indian Ocean'

Hey guys, I've realised that I have been doing a lot of swatch posts recently, but I discovered some nail varnishes that your eyes need to be exposed to! I went on a little shopping trip to Westfield Stratford recently and acquired my very first Models Own nail varnish and yes... I was very happy to now have one in my possession!! :D
I really do love this polish and have seen it being swatched on various blogs, but I thought I would post it layered with a few different colours and experiment a little. So here it is... 'Indian Ocean' by Models Own as part of the 'Beetlejuice Collection'.


As you can see on the finger next to the pinky, the nail varnish itself is pretty sheer
and so it's one of those which needs to be layered for the full effect,
though I actually didn't mind it on it's own. Didn't really need a top coat as it's smooth
enough when dry! Isn't a pain to get off either, even though it has glitter.
Nail varnish used: Black by Beauty UK, Sunshine by Rimmel, Misty Jade by
Rimmel & White by Barry M


The only negative thing when wearing 'Indian Ocean' on it's own is that because it's sheer, it shows your white nail tip and so sometimes it can make your nails look a little dirty. Though over all, I think it's a pretty good buy - you get a different effect depending on which colour you use as a base. I'm not into Pink to be honest, but I think it looks pretty good layered on top of the black - would be useful for a galaxy inspired nail design? ;) My personal favourite would probably be with the Misty Jade base. For each of these, I put one coat of the coloured base and 2 coats of 'Indian Ocean'.


You can usually find them in stores like Superdrug/Boots for £5.00 of on their website :)
http://www.modelsownit.com/


Sunday, 24 June 2012

Golden Swirls

Hello from the land of revision zombies O_O
A few things have happened since I last posted on here causing delays and nail withdrawal symptoms, but I'm reunited again and boyyyy, does it feel good!
This has pretty much been my life for a good couple of months whilst I plowed through 5 exams - took a lot of blood, sweat and tears, but I finally got there in the end gaining freedom on the afternoon of the 20th July. Literally felt like I had escaped house and daylight arrest after 94883647634 years...
I lived in a house of messy papers, became a caffeine addict, had permanently scraped back hair and was always in a state of grumpyness when someone interrupted my silence - all to play the dreaded waiting game until DOOMS DAY: 16th August (Results Day) I've never wanted anything so much in my life before, to be honest. Going to university and studying Law means getting one step closer to what I've always wanted to do, no matter how cliché it may sound! *soppy*


Anyway, now I feel as free as a bird, literally. I can finally spend my summer chillin', reading the books leisurely, complete the Assassin's Creed games, NAIL BLOG (of course!), spend time with loved ones and party for my 18th ;) (Which is only 9 days away!!) Revision period is always one of those times where even people who LOVE to eat like me, completely forget to due to lack of appetite and stress unfortunately so my friends and I treated ourselves to a well deserved pig out at Pizza Hut buffet straight after our last exam :)


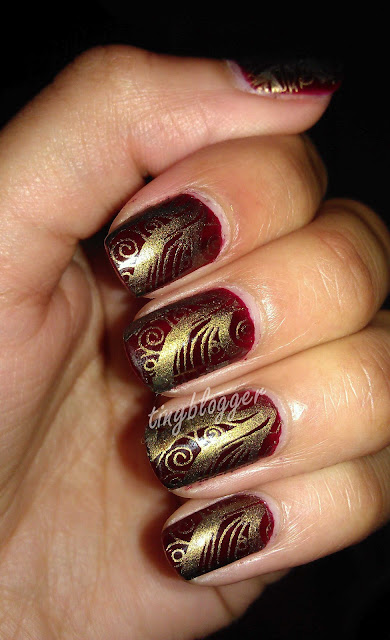
So when I actually had a chance to make my nails look pretty, you can't imagine the amount of satisfaction I felt... Today's nails will be called 'Gold Swirls' because it's self explanatory! I really really like this design and it's actually quite simple when applying if you have the stamps and plates.


I know I've used this stamping plate a few times before but it's one of my favourites and I find that it makes really unique effects when mixing up the colour schemes. At the moment, these are the two colours that I think go best together for this design. You can find the plate that I used on my post on Day 6 of the Black & White Challenge here.


I used W7 - Metallic Saturn, Barry M - Red Black
& Barry M Base/Top Coat

Goodnight from a very tired nail blogger x

Saturday, 9 June 2012

Day 7 *Black & White Challenge* - Moonies Are Back!

'Moonies Are Back!'

Today's mani theme was the famous half-moon manicure! But with some sort of black/white... I think I'm gonna give up apologising about the lateness because you all know... The challenge essentially has actually finished, but my posts are not quite there yet :P
Here's my little take on this theme, hope you like it - it's pretty self explanatory.


These are the nail varnishes I used, along with a small headed dotting
tool and some circular half-moon mani stickers that Nada
kindly gave me <3
I actually really liked the way this design looked, no matter how simple it is. I especially like the way the w7 'Metallic Saturn' looks with the black. I know I'll be taking my time in doing this one next time I'm rockin' the little black dress next time I'm out :)


I know this post was pretty short, thought I would explain it all with photos this time, saves you all reading my rambling thoughts that are typed out on here ;)
Let me know what you think of this little number!

Check out Nada's & Charlotte's posts here.

Day 1:White Base With Black
Day2: Black Base With White
Day3: White/Black Inspired By A Band
Day 4: Black With Glitter
Day 5: Coloured Base With Black/White
Day 6: Gradient Base With Black
Day 7: Black/White Half Moon Manicure


Adios amigos x


Saturday, 2 June 2012

Day 6 *Black & White Challenge* - Gradient Shmadient

'Gradient Shmadient'

Apologies for the late post!
I had a total creative block with this one and I hit smack. bang. into a brick wall alright :( Nevertheless I had to come up with something, so I rocked this little number on my nails for the gradient base with black part of the challenge! Not the biggest fan of the way it turned out, but hey ho, here you go ;)


For this design I decided to crack out my stamping plates - the same one that Nada used for her Day 1! Its a pretty unusual pattern and I quite like it :) Bit difficult to get it to fit your entire nail though, unless you have small/thin nails - which I kinda do! But not thin enough...?


These are the nail polishes I used!

Didn't really take me too long, but if you're going to apply stamps over a gradient base, you should ensure that the gradient base is fully dry otherwise it will all stick together and smudge and you won't get a good effect :( Patience is a virtue! :)


Hope you enjoy & thanks for reading! x

Day 1:White Base With Black
Day2: Black Base With White
Day3: White/Black Inspired By A Band
Day 4: Black With Glitter
Day 5: Coloured Base With Black/White
Day 6: Gradient Base With Black

You can see Nada's & Charlotte's here.


Monday, 28 May 2012

Day 5 *Black & White Challenge* - Fit For A Queen!

'Fit For A Queen'

"There ain't no black in the Union Jack" - Gilroy, Sociologist.
Well, there is in mine and an accent nail at that, too! You guessed it... My design for Day 5 has indeed been inspired by the Queen's Jubilee on June 5th, so I thought I would pay my tributes to that in terms of nails :) This time, I really did get creative and it's by far one of my favourite nail designs!

Here are the nail varnishes I used for this!

TADAAAA!
This was totally free hand using my nifty little brushes and I decided to jazz it up with an accent nail - black, white and glittery union jack, just to add some presence. I think the Queen would be impressed? ;)
Usually people ask me: "Did that take you long?!" and I often reply with "Nope, not really" but for reals, this time IT TOOK LONGGGGGG. Like forever. Like over an hour.
So folks, don't try this one out if you really don't have patience :P (Which I don't usually have a lot of surprisingly...)
Recently, the weather has been uber kind to us in England! SO HOT. Considering its only May! But I'm not complaining :) So I embraced the sun with open arms, some friends, a picnic blanket and of course... Starbucks! The nails have really matched the atmosphere where I live, everyone's getting patriotic and all summery and I love it!

Me and my chum Hazel sunnin' up :)


I decided that my nails matched what I wore in terms of British style - Burberry/Tartany cropped trousers and a cute little cherry flow skirt. I guess I really embraced the 70's/80's and 50's look whilst these babies were my nails!


Hope you all liked this design just as much as I do :) Feel free to contact me if you have any questions!
You can check out Nada & Charlotte's post here.

Day 1:White Base With Black
Day2: Black Base With White
Day3: White/Black Inspired By A Band
Day 4: Black With Glitter
Day 5: Coloured Base With Black/White


So get festive & enjoy! x


DAY 4 *Black & White Challenge* - Cosmic Stripe

'Cosmic Stripe'

Apologies little nail followers for the extreme lateness with this post and consequently with Day 5 too :( As I said at the beginning of the challenge, lots of things will be happening and changing at this point in my life, so there will inevitably be lateness and of course everyone knows that I am #foreverlate... for everything.
However, I done it! It is here! And I hope you like it!
I introduce to you all... Day 4 of the challenge... ! (Which I decided to name 'Cosmic Stripe' because I guess it kinda reminded me of spaceyness...)

From left to right:
LA COLOURS (Star Light), Barry M (Base & Top Coat), W7 (Cosmic Green),
Beauty UK (Black No.6) - I used a brush & sponge too.


If I'm honest, I could have used some nail tape tomake straight lines but I'm not a massive fan of lots of glitter on my nails all the time so I kinda took it off straight after! Glitter is a PAIN IN THE BUM. So I opted out of the hassle of taking it off. I sponged on some glitter to make a gradient style on the nails which aren't striped and then decided I wanted to make use of some of the coloured glitter nail varnishes I own and added in Cosmic Green. It took quite a few coats of Star Light to look fully.. glittered up, but I got there eventually!

On the plus side, I finally got some storage for all my nail and beauty stuff, now I won't have everyone nagging at me to organise my nail stuff that I leave everywhere xD


Check out Nada & Charlotte's posts here.


Day 1:White Base With Black
Day2: Black Base With White
Day3: White/Black Inspired By A Band
Day 4: Black With Glitter


Adios mis amigos x

Sunday, 20 May 2012

DAY 3 *Black & White Challenge* - Lithium

'Lithium'


Today's nail design involves a band that I mentioned in my last post - they're such a blast from the past for me at the moment and I'm just getting back into listening to them. Ahh good old nostalgia :') The name of this design is after one of there songs.
That's right... You guessed it! My nails have indeed been inspired by the one and only Nirvana.

From left to right:
Dave Grohl (Drummer)
Kurt Cobain (Vocalist/Guitarist)
Krist Novoselic (Bassist)


For this design, I used quite a few nail polishes (5 to be exact...), some studs - which I love so much and can't get enough of (seriously) and a longish tipped brush - but not the longest, because lots of precision and patience was needed!


Hope this photo isn't too small?!


I made sure that on each nail I could do something different, yet colours or a symbol that may represent the band. Feast your eyes on these babies! - Which I am so happy with :)


My precious studs! :)


Day 1: White Base With Black
Day 2: Black Base With White
Day 3: White/Black Inspired By A Band

You can find Nada's post here.
Hope you enjoyed this little post, keep your eyes peeled for Day 4 - Every cloud has a glittery lining!

Adios amigos x

Thursday, 26 April 2012

Can't Go Wrong With A Bit O' Crackle!

Good evening nailoholics! <3
Thought I would post a lil' something on a swatch I did earlier this week involving gradient colours and Barry M Black Crackle (ooooOooo!) Technical indeed. Well, actually, not really. Gradient nails are super easy to try out! All you need is an ordinary sponge and the colours you want to blend into each other - that's it.
I'm dedicating this post to one of my friends Charlotte, because she originally inspired me with the idea of trying out gradient nails :) (Check out her blog, it's brilliant!) I saw her with her awesome maroon and gold gradient nails at school and thought... yes. This is for me!

Here is when the amazing Barry M Crackle came into mind, as I hadn't used it for so long.
I mean, come on, you just can't go wrong with it!
So simple and effective.


So basically, just gather 3 colours to blend.
Put the bottom and lightest (usually) colour on your nail first.
Allow to dry and then apply slightly darker colour onto a sponge and dab onto the nail, fading out and blending the colours.
Do the same with the darkest colour on the tip of the nail - once its dry apply your Barry M crackle (or whichever make you have!) and don't forget to apply a top coat for longer lasting nails :)


Let me know what you think! Enjoy x